If you are writing a grant proposal in Word, it's a good idea to use vector-based images for your diagrams and graphs. And when you are ready to export your PDF from Word for submission, it's important to export it correctly so that your quality images are retained in the PDF. (Here is why you should care about vector based images in your proposal and retaining them into your PDF.)
➡️ Group your images to their corresponding caption.
- Even using the best techniques for exporting a PDF, sometimes they turn out different than what you see within word. Grouping your figures and their captions helps avoid this. Also, it's nice if you are moving around pages, etc.
Exporting a PDF: ON A PC:
- This list walks through the steps shown in that video.
- ✅Anyway that you export a PDF from word, the vector image will stay a vector image.
- ➡️If you want the images to be higher resolution than 220dpi, then you have to change your change your PDF export options by going File, Options, Advanced, Image Size and Quality (just below “Pen).
- ➡️Select 330 ppi.
- ➡️You can change this for “all new documents”, but if you are opening documents sent to you by other people, it will default back to 220 EVERYTIME, so you have to come back into this menu. While you are in here, if there is ever a chance you are going to enlarge pixel images within word later, then it’s not a bad idea to check the box for "Do not compress images in the file.” This has NO effect on your PDFs, but it does effect your Word file. When you save and close your word file, without this box checked, it will downsameple your images to 330 DPI. So when you open your file again, if you go to enlarge your images, they will now be less than 330dpi, even if the original PNG was huge. But this check box will make your word files larger, so if you are never going to use it than you could leave it off.
- ❌Realistically, everyone is going to forget to change these settings so it’s probably going to be 220dpi (the default) from Word most of the time. 220dpi is just fine for looking at the image at the size it’s shown. But if users are going to zoom way in on their screen devices, or if there is tiny text, then it’s nice to have higher resolution than this.
- Better Option: ✅ “Save as Adobe PDF” works best for both vector and pixel based images.
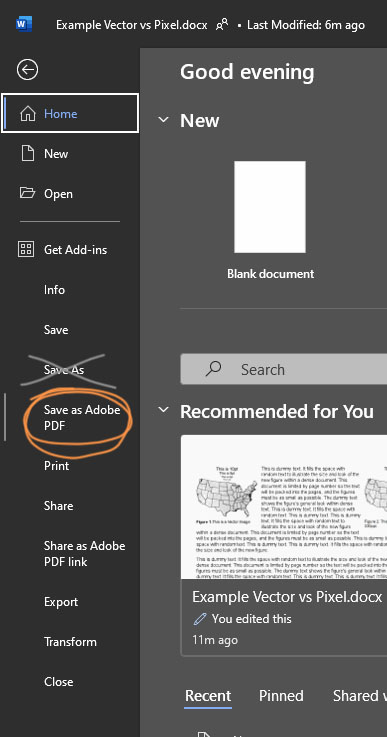
- ✅ Using this options follows the Resolution that you have entered in the options settings, but only up to 300/330. So, if you have 330 selected, it allow 330dpi images to stay that way, but anything brought in over 330 will appear as 300dpi. Lower-than-300 resolution images will be exported at whatever they came in at. If you have your settings set to 220, then all images will be at 220 (or less if they came in as less). If you have High Fidelity selected, it will be the same as 330.
- ✅ Vector images come out beautifully too.
- Worse Option: ❌ “Save as” (as I crossed out in my screen shot above) and then selecting “PDF” seems to have a minimum stroke thickness feature that isn’t ideal. (inflates all thin lines to 0.87pt, which is such a random number...) If you all your lines are over this thickness, it doesn't matter, but the option above is better. If you are using this option for some reason, it will ignore your preferences for pixel based image resolutions, so you have to change the settings within the Save As dialog. Once you select 'PDF' from the drop-down, you have the choice of "optimize for," and next to save there is a 'tools' button, and there is also an optimize button. In my tests, no matter what you select from any of these, the images won't come out above 220dpi. They are all just joke options. It’s always 220.
- Wild Card Option: ❓ Print, and then select PDF as your printer. This might work great, or not. I think your results using this option will depend on your availible print drivers, so it's harder for me to advise you.
Exporting a PDF: ON A MAC:
- I don't own a mac, so I haven't done as through of testing, but I have done some:
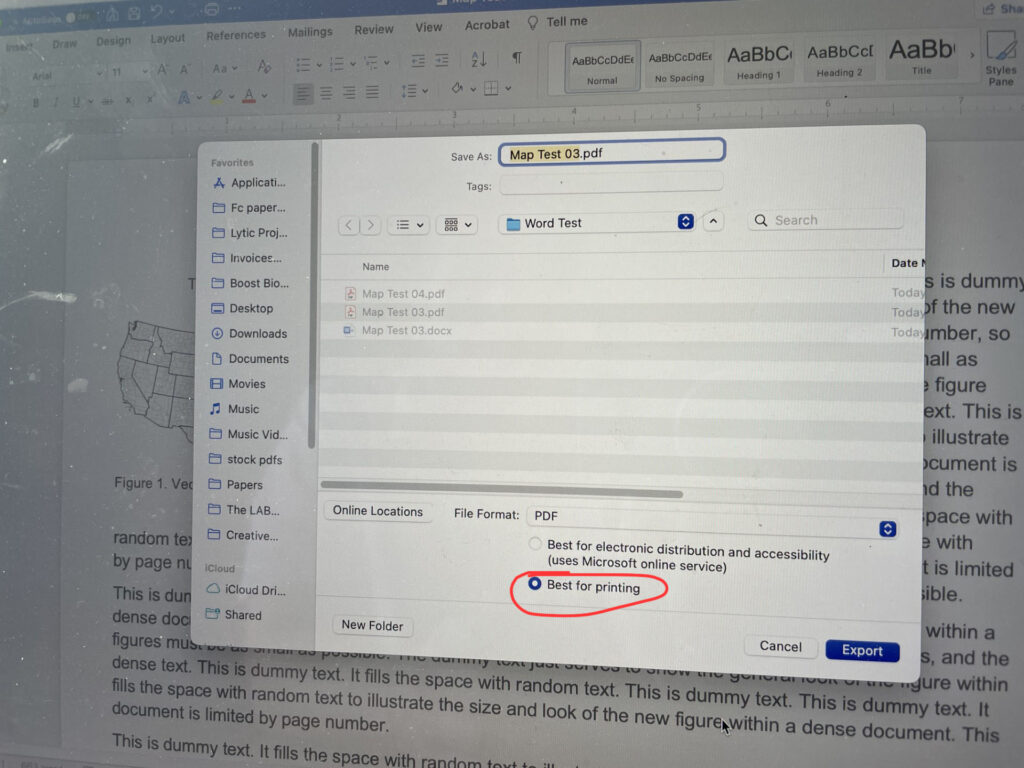
- ❌ “Save as” and then selecting PDF will default to terrible settings that will rasterize all of your vector images into potentially-blurring pixel-based images.
- 1) ✅ On the "Save as" dialog box, find the option for "best for printing." Ironically, this setting will have the most benefit for viewers using a Screen, and not printing it, but regardless of the terminology, this setting works! Vectors will stay vectors.
- 2) ✅Another viable option (based on my very quick tests borrowing other people's people's computers), is to "Print" and then select PDF as your printer. This could be different on different computers based on your print drivers, so always check your PDF over carefully.
The proof is always in the pudding
- Look over your PDF to make sure nothing crazy happened with the images getting separated from your captions (grouping them will prevent this!)
- Zoom in on your figures and make sure they look their best
- File Size: Make sure your fine size is OK for whatever granting agency you are submitting too. For vector based diagrams, the shouldn't add much to your file size. If you downloaded a vector map from a fancy source, there is a chance that it includes multiple millions of nodes, and that could be a problem. Check the file sizes on your SVGs files, and if they are indeed the culprit, use "simplify" settings in Adobe Illustrator. It's more likely that your large size is coming from a scanned & signed letter from a collaborator that you appended to your PDF!